深入剖析Guava Cache原理
Guava Cache 是非常强大的本地缓存工具,提供了非常简单 API 供开发者使用。
这篇文章,我们将详细介绍 Guava Cache 的基本用法、回收策略,刷新策略,实现原理、实战招式。
1 基本用法
1.1 依赖配置
<dependency>
     <groupId>com.google.guava</groupId>
     <artifactId>guava</artifactId>
     <version>31.0.1-jre</version>
</dependency>
1.1 创建缓存
Guava Cache 提供了基于 Builder 构建者模式的构造器,用户只需要根据需求设置好各种参数即可使用。
1、手工创建缓存对象
@Test
public void testHandCache() {
      // 测试手工测试
      Cache<String, String> cache = CacheBuilder.newBuilder().
              // 最大容量为20(基于容量进行回收)
                      maximumSize(20)
              // 配置写入后多久未更新,缓存会过期
              .expireAfterWrite(10, TimeUnit.SECONDS).build();
      cache.put("hello", "value_HELLO");
      assertEquals("value_HELLO", cache.getIfPresent("hello"));
      Thread.sleep(10000);
      // 过期后重新获取
      assertNull(cache.getIfPresent("hello"));
}
我们可以创建一个缓存对象 Cache ,通过 CacheBuilder 构造器,配置相关参数(最大容量 20 个条目、缓存过期时间 10 秒),最后调用构建方法。
2、创建缓存加载器
CacheLoader 可以理解为一个固定的加载器,在创建 Cache 对象时指定,然后简单地重写 V load(K key) throws Exception 方法,就可以达到当检索不存在的时候,会自动的加载数据。
@Test
public void testLoadingCache() throws InterruptedException, ExecutionException {
      CacheLoader<String, String> cacheLoader = new CacheLoader<String, String>() {
          //自动写缓存数据的方法
          @Override
          public String load(String key) {
              System.out.println("加载 key:" + key);
              return "value_" + key.toUpperCase();
          }
          @Override
          //异步刷新缓存
          public ListenableFuture<String> reload(String key, String oldValue) throws Exception {
              return super.reload(key, oldValue);
          }
      };

      LoadingCache<String, String> cache =
              CacheBuilder.newBuilder()
                      // 最大容量为100(基于容量进行回收)
                      .maximumSize(20)
                      // 配置写入后多久未更新,缓存会过期
                      .expireAfterWrite(10, TimeUnit.SECONDS)
                      //配置写入后多久刷新缓存
                      .refreshAfterWrite(1, TimeUnit.SECONDS).build(cacheLoader);
        assertEquals(0, cache.size());
        assertEquals("value_HELLO", cache.getUnchecked("hello"));
        assertEquals(1, cache.size());

     // 通过 Callable 获取数据
       String key = "mykey";
       String value = cache.get(key, new Callable<String>() {
          @Override
           public String call() throws Exception {
               return "call_" + key;
          }
        });
       System.out.println("call value:" + value);
}
和手工创建缓存对象不同,我们首先创建缓存加载器对象,并重写 load 方法,然后通过缓存构造器创建 LoadingCache 对象 ,该对象支持写入后刷新方法。
同时 LoadingCache 对象支持 Callable 模式,也就是调用 get 方法时,可以传入 Callable 对象。这样可以在使用缓存时,更加灵活。
2 回收策略
Guava Cache 提供了三种基本的缓存回收方式:
- 基于容量回收策略
- 基于时间的回收策略
- 基于引用回收策略
2.1 基于容量回收策略
基于容量的回收策略可以分为两种:基于大小和基于权重。
基于大小:我们可以使用 maximumSize 方法设置最大缓存项数量,当缓存项数量达到设定的最大值时,旧的缓存项将会被移除。
Cache<Object, Object> cache = CacheBuilder.newBuilder()
    .maximumSize(100)
    .build();
基于权重:如果不同的缓存值,需要占据不同的内存空间,也就是不同的缓存项有不同的“权重”(weights)。
我们可以使用 CacheBuilder.weigher(Weigher) 指定一个权重函数,并且用 maximumWeight(long) 指定最大总重。
Cache<Object, Object> cache = CacheBuilder.newBuilder()
    .maximumWeight(1000)
    .weigher(new Weigher<Object, Object>() {
        public int weigh(Object key, Object value) {
            // 定义权重计算方法
            return value.size();
        }
    }).build();
2.2 基于时间的回收策略
我们可以使用 expireAfterAccess 和 expireAfterWrite 方法设置缓存项的最大存活时间。
expireAfterAccess表示缓存项在给定时间内没有被读/写访问会过期。expireAfterWrite表示缓存项在被创建或最后一次更新后的指定时间内会过期。
Cache<Object, Object> cache = CacheBuilder.newBuilder()
    // 10分钟没有访问后会被回收,或者重新加载
    .expireAfterAccess(10, TimeUnit.MINUTES)
    // 5分钟没有更新,缓存会被回收,或者重新加载
    // .expireAfterWrite(5,TimeUnit.MINUTES)
.build();
2.3 基于引用回收策略
Guava Cache 提供了以下三个方法来配置基于引用的回收策略:
weakKeys() 方法:
通过调用
weakKeys()方法,可以使缓存中的键使用弱引用。这意味着如果某个键没有其他强引用指向它,那么该键可能会被垃圾回收,并且相应的缓存项也会被移除。
   Cache<Object, Object> cache = CacheBuilder.newBuilder()
       .weakKeys()
       .build();
weakValues() 方法:
通过调用
weakValues()方法,可以使缓存中的值使用弱引用。这样,如果某个值没有其他强引用指向它,那么该值可能会被垃圾回收,相应的缓存项也会被移除。
   Cache<Object, Object> cache = CacheBuilder.newBuilder()
       .weakValues()
       .build();
softValues() 方法:
通过调用
softValues()方法,可以使缓存中的值使用软引用。软引用相对于弱引用,更倾向于在内存不足时被垃圾回收。如果某个值没有其他强引用指向它,且内存不足时,该值可能会被垃圾回收,相应的缓存项也会被移除。
   Cache<Object, Object> cache = CacheBuilder.newBuilder()
       .softValues()
       .build();
一般来讲,我们在生产环境使用的是(基于容量回收策略 + 基于时间的回收策略)两者配合来使用。
当然 ,我们同样可以使用手工回收的方式。
Cache<String,String> cache = CacheBuilder.newBuilder().build();
Object value = new Object();
cache.put("key1","value1");
cache.put("key2","value2");
cache.put("key3","value3");

//1.清除指定的key
cache.invalidate("key1");

//2.批量清除list中全部key对应的记录
List<String> list = new ArrayList<String>();
list.add("key1");
list.add("key2");
cache.invalidateAll(list);
3 刷新策略
3.1 手工刷新
我们可以强制缓存加载器重新加载键的新值,调用 LoadingCache 对象的刷新方法。
String value = loadingCache.get("key");
loadingCache.refresh("key");
3.2 自动刷新
Guava Cache 提供了刷新(refresh)机制,可以通过 refreshAfterWrite 方法来设置刷新时间,当缓存项过期的同时可以重新加载新值。
Cache<String, String> cache = CacheBuilder.newBuilder()
    .refreshAfterWrite(5, TimeUnit.MINUTES)
     // 设置并发级别为3,并发级别是指可以同时写缓存的线程数
    .concurrencyLevel(3)
    .build(new CacheLoader<String, String>() {
        @Override
        public String load(String key) throws Exception {
            // 异步加载新值的逻辑
            return fetchDataFromDataSource(key);
        }
    });
// 在获取缓存值时,如果缓存项过期,将返回旧值
String value = cache.get("exampleKey");
配置刷新方法refreshAfterWrite,当大量线程同时访问缓存项,缓存已过期时,更新线程调用 load 方法更新该缓存,其他请求线程并不需要等待,但返回该缓的旧值。
因为更新线程也是请求线程,所以在上面的示例代码里面,刷新缓存是个同步操作,可不可以异步的加载缓存呢 ?
我们有两种方式:异步加载缓存的原理是重写 reload 方法。
@Test
public void testAnsynRefreshMethod1() throws InterruptedException, ExecutionException {
      ExecutorService executorService = Executors.newFixedThreadPool(5);
      CacheLoader<String, String> cacheLoader = new CacheLoader<String, String>() {
          //自动写缓存数据的方法
          @Override
          public String load(String key) {
              System.out.println(Thread.currentThread().getName() + " 加载 key:" + key);
              // 从数据库加载数据
              return "value_" + key.toUpperCase();
          }

          @Override
          //异步刷新缓存
          public ListenableFuture<String> reload(String key, String oldValue) throws Exception {
              ListenableFutureTask<String> futureTask = ListenableFutureTask.create(() -> {
                  System.out.println(Thread.currentThread().getName() + " 异步加载 key:" + key + " oldValue:" + oldValue);
                  Thread.sleep(1000);
                  return load(key);
              });
              executorService.submit(futureTask);
              return futureTask;
          }
      };

      LoadingCache<String, String> cache = CacheBuilder.newBuilder()
              // 最大容量为20(基于容量进行回收)
              .maximumSize(20)
              //配置写入后多久刷新缓存
              .refreshAfterWrite(2, TimeUnit.SECONDS).build(cacheLoader);

       String key = "hello";
       // 第一次加载
       String value = cache.get(key);
       System.out.println(value);
       Thread.sleep(3000);
      for (int i = 0; i < 10; i++) {
          executorService.execute(new Runnable() {
              @Override
              public void run() {
                  try {
                      String value2 = cache.get(key);
                      System.out.println(Thread.currentThread().getName() + value2);
                      // 第二次加载
                  } catch (Exception e) {
                       e.printStackTrace();
                  }
              }
          });
      }
      Thread.sleep(20000);
}
或者使用更优雅的使用方式:
ExecutorService executorService = Executors.newFixedThreadPool(5);
CacheLoader<String, String> cacheLoader = CacheLoader.asyncReloading(
           new CacheLoader<String, String>() {
                  //自动写缓存数据的方法
                  @Override
                  public String load(String key) {
                      System.out.println(Thread.currentThread().getName() + " 加载 key:" + key);
                      // 从数据库加载数据
                      return "value_" + key.toUpperCase();
                  }
            } , executorService);
自动刷新的缺点是:当缓存项到了指定过期时间,不管是同步刷新还是异步刷新,绝大部分请求线程都会返回旧的数据值,缓存值会有一定的延迟效果。
所以一般场景下,使用efreshAfterWrite和 expireAfterWrite配合使用 。
比如说控制缓存每1秒进行刷新,如果超过 2s 没有访问,那么则让缓存失效,访问时不会得到旧值,而是必须得待新值加载。
4 实现原理
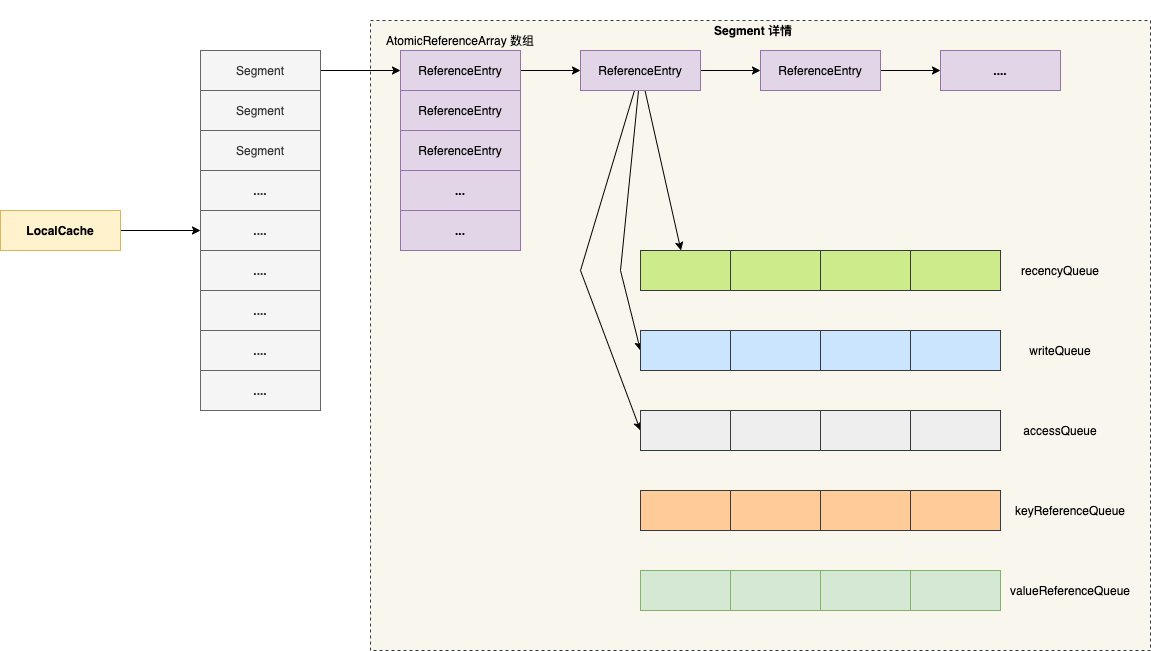
Guava Cache 的数据结构跟 JDK1.7 的 ConcurrentHashMap 类似,如下图所示:

4.1 创建缓存对象
public <K1 extends K, V1 extends V> LoadingCache<K1, V1> build(
      CacheLoader<? super K1, V1> loader) {
   checkWeightWithWeigher();
   return new LocalCache.LocalLoadingCache<>(this, loader);
}
通过构造器 CacheBuilder 的构建方法创建本地缓存类 LocalCache 的静态包装类 LocalLoadingCache对象。
class LocalCache<K, V> extends AbstractMap<K, V> implements ConcurrentMap<K, V> {
   // ..... 省略代码
   static class LocalLoadingCache<K, V> extends LocalManualCache<K, V>
      implements LoadingCache<K, V> {

    LocalLoadingCache(
        CacheBuilder<? super K, ? super V> builder, CacheLoader<? super K, V> loader) {
      super(new LocalCache<K, V>(builder, checkNotNull(loader)));
    }
    // LoadingCache methods
    @Override
    public V get(K key) throws ExecutionException {
      return localCache.getOrLoad(key);
    }
    @Override
    public V getUnchecked(K key) {
      try {
        return get(key);
      } catch (ExecutionException e) {
        throw new UncheckedExecutionException(e.getCause());
      }
    }
    @Override
    public ImmutableMap<K, V> getAll(Iterable<? extends K> keys) throws ExecutionException {
      return localCache.getAll(keys);
    }
    @Override
    public void refresh(K key) {
      localCache.refresh(key);
    }
   // ..... 省略代码
  }
}
LocalLoadingCache 类对外暴露了若干方法,它的底层依然是 LocalCache 对象来执行相关缓存操作,LocalCache 本质上就是一个 Map 。
4.2 初始化缓存
LocalCache(
      CacheBuilder<? super K, ? super V> builder, @Nullable CacheLoader<? super K, V> loader) {
    concurrencyLevel = Math.min(builder.getConcurrencyLevel(), MAX_SEGMENTS);
    // key的强度,即引用类型的强弱
    keyStrength = builder.getKeyStrength();
    // value的强度,即引用类型的强弱
    valueStrength = builder.getValueStrength();
    // key的比较策略,跟key的引用类型有关
    keyEquivalence = builder.getKeyEquivalence();
    // value的比较策略,跟value的引用类型有关
    valueEquivalence = builder.getValueEquivalence();

    maxWeight = builder.getMaximumWeight();
    weigher = builder.getWeigher();
    //访问后的过期时间,设置了expireAfterAccess参数
    expireAfterAccessNanos = builder.getExpireAfterAccessNanos();
     //写入后的过期时间,设置了expireAfterWrite参数
    expireAfterWriteNanos = builder.getExpireAfterWriteNanos();
    refreshNanos = builder.getRefreshNanos();

    int initialCapacity = Math.min(builder.getInitialCapacity(), MAXIMUM_CAPACITY);
    if (evictsBySize() && !customWeigher()) {
      initialCapacity = (int) Math.min(initialCapacity, maxWeight);
    }
    // Find the lowest power-of-two segmentCount that exceeds concurrencyLevel, unless
    // maximumSize/Weight is specified in which case ensure that each segment gets at least 10
    // entries. The special casing for size-based eviction is only necessary because that eviction
    // happens per segment instead of globally, so too many segments compared to the maximum size
    // will result in random eviction behavior.
    int segmentShift = 0;
    int segmentCount = 1;
    while (segmentCount < concurrencyLevel && (!evictsBySize() || segmentCount * 20 <= maxWeight)) {
      ++segmentShift;
      segmentCount <<= 1;
    }
    this.segmentShift = 32 - segmentShift;
    segmentMask = segmentCount - 1;

    this.segments = newSegmentArray(segmentCount);

    int segmentCapacity = initialCapacity / segmentCount;
    if (segmentCapacity * segmentCount < initialCapacity) {
      ++segmentCapacity;
    }
    int segmentSize = 1;
    while (segmentSize < segmentCapacity) {
      segmentSize <<= 1;
    }
    if (evictsBySize()) {
      // Ensure sum of segment max weights = overall max weights
      long maxSegmentWeight = maxWeight / segmentCount + 1;
      long remainder = maxWeight % segmentCount;
      for (int i = 0; i < this.segments.length; ++i) {
        if (i == remainder) {
          maxSegmentWeight--;
        }
        this.segments[i] =
            createSegment(segmentSize, maxSegmentWeight, builder.getStatsCounterSupplier().get());
      }
    } else {
      for (int i = 0; i < this.segments.length; ++i) {
        this.segments[i] =
            createSegment(segmentSize, UNSET_INT, builder.getStatsCounterSupplier().get());
      }
    }
}
LocalCache 维护一个 Segment 数组,数组大小满足如下条件:
- 数组大小是 2 的幂次 ,并且小于并发度 concurrencyLevel ;
- 若指定了容量大小,数组大小乘以 20 要大于缓存权重 maxWeight (假如设置容量大小最大值为40,那么 maxWeight 为 40 )。
接下来,我们看看 Segment 类的核心属性 :
static class Segment<K, V> extends ReentrantLock {
    // 存活的元素大小
    volatile int count;
    // 存活的元素权重
    long totalWeight;
    //修改、更新的数量,用来做弱一致性
    int modCount;
    //扩容用
    int threshold;
    //存放Entry的数组,用来存放Entry,使用AtomicReferenceArray是因为要用CAS来保证原子性
    volatile @Nullable AtomicReferenceArray<ReferenceEntry<K, V>> table;
     //如果key是弱引用的话,那么被 GC 回收后,就会放到ReferenceQueue,要根据这个queue做一些清理工作
    final @Nullable ReferenceQueue<K> keyReferenceQueue;
    //如果value是弱引用的话,那么被 GC 回收后,就会放到ReferenceQueue,要根据这个queue做一些清理工作
    final @Nullable ReferenceQueue<V> valueReferenceQueue;
    //记录哪些entry被访问,用于accessQueue的更新。
    final Queue<ReferenceEntry<K, V>> recencyQueue;
    // 读取次数计数器
    final AtomicInteger readCount = new AtomicInteger();
    // 如果一个元素新写入,则会记到这个队列的尾部,用来做expire
    @GuardedBy("this")
    final Queue<ReferenceEntry<K, V>> writeQueue;
    //读、写都会放到这个队列,用来进行LRU替换算法
    @GuardedBy("this")
    final Queue<ReferenceEntry<K, V>> accessQueue;
}
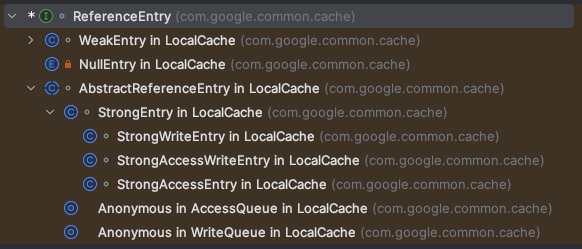
ReferenceEntry 有几种引用类型 :

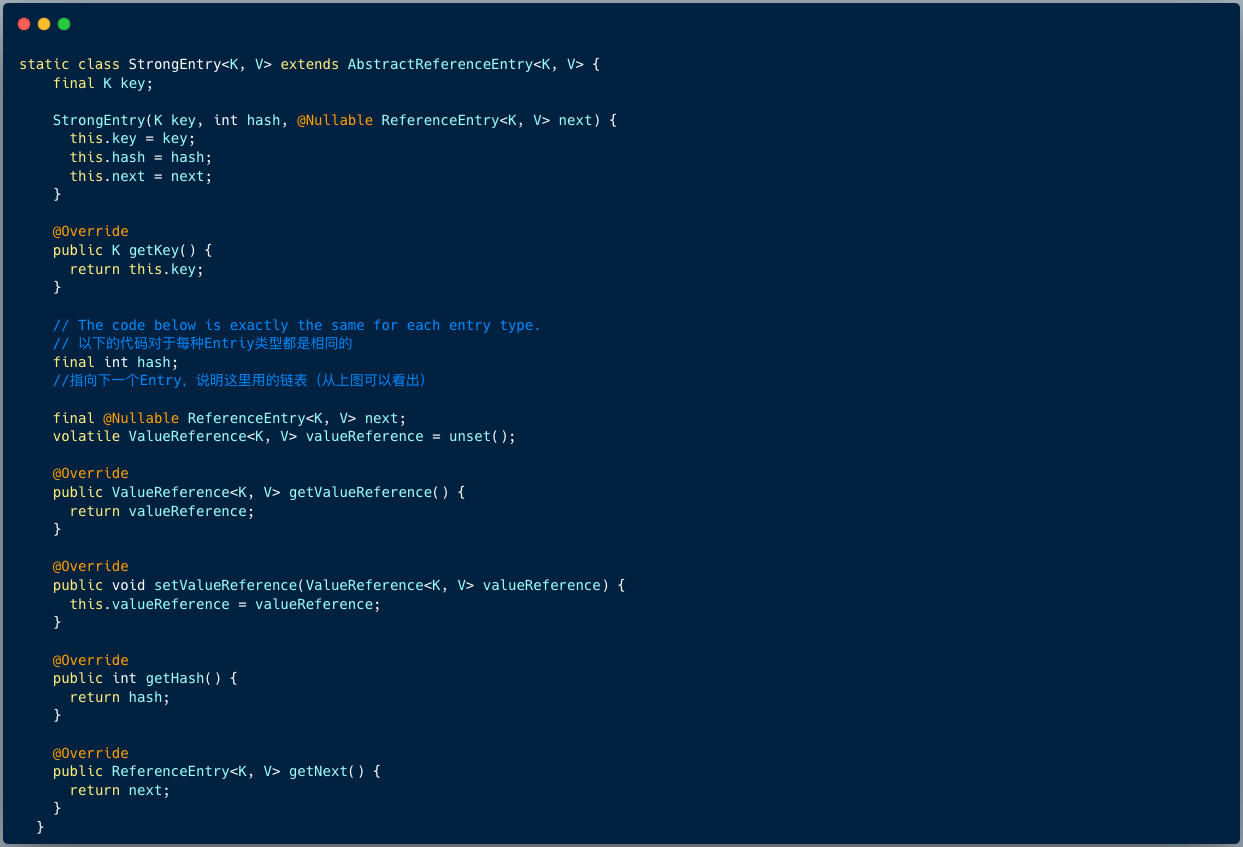
下图展示了 StringEntry 核心属性 :

每种 Entry 对象都有 Next 属性 ,指向下一个 Entry 。对象值 valueReference 默认是一个占位符 unSet ,表示没有被设置过值。
4.3 查询流程
进入 LoadingCache 的 get(key) 方法 , 如下代码所示:
// 1.调用LoadingCache的getOrLoad
V getOrLoad(K key) throws ExecutionException {
    return get(key, defaultLoader);
}
// 2.计算 key 的哈希值,并判断位于哪一个段 Segment,最后通过查询
V get(K key, CacheLoader<? super K, V> loader) throws ExecutionException {
    int hash = hash(checkNotNull(key));
    return segmentFor(hash).get(key, hash, loader);
}
01 计算 key 对应的哈希值
int hash(@Nullable Object key) {
    int h = keyEquivalence.hash(key);
    return rehash(h);
}
02 定位分段 Segment
Segment<K, V> segmentFor(int hash) {
   // segmentMask =  segmentCount - 1
   return segments[(hash >>> segmentShift) & segmentMask];
}
第二步骤,和 ConcurrentHashMap 类似,通过哈希值计算数据存储在哪一个分段 Segment 。
03 从定位的分段查询出对象
V get(K key, int hash, CacheLoader<? super K, V> loader) throws ExecutionException {
      // 判断 key、loader 是否为空
      checkNotNull(key);
      checkNotNull(loader);
      try {
        if (count != 0) { // read-volatile
          // don't call getLiveEntry, which would ignore loading values
          // 根据hash定位到 table 的第一个 Entry
          ReferenceEntry<K, V> e = getEntry(key, hash);
          if (e != null) {
            // 获取当前时间
            long now = map.ticker.read();
            // 获取当前存活的 Value
            V value = getLiveValue(e, now);
            if (value != null) {
              //记录被访问过
              recordRead(e, now);
              //记录命中率
              statsCounter.recordHits(1);
              //判断是否需要刷新,如果需要刷新,那么会去异步刷新,且返回旧值。
              return scheduleRefresh(e, key, hash, value, now, loader);
            }
            ValueReference<K, V> valueReference = e.getValueReference();
            //如果 Entry 过期了且数据还在加载中,则等待直到加载完成。
            if (valueReference.isLoading()) {
              return waitForLoadingValue(e, key, valueReference);
            }
          }
        }
        // at this point e is either null or expired;
        // 走到这一步表示: 之前没有写入过数据 || 数据已经过期 || 数据不是在加载中。
        return lockedGetOrLoad(key, hash, loader);
      } catch (ExecutionException ee) {
        Throwable cause = ee.getCause();
        if (cause instanceof Error) {
          throw new ExecutionError((Error) cause);
        } else if (cause instanceof RuntimeException) {
          throw new UncheckedExecutionException(cause);
        }
        throw ee;
      } finally {
        postReadCleanup();
      }
 }
01 定位第一个Entry
ReferenceEntry<K, V> getEntry(Object key, int hash) {
    for (ReferenceEntry<K, V> e = getFirst(hash); e != null; e = e.getNext()) {
      // 判断哈希值
      if (e.getHash() != hash) {
        continue;
      }
      // 判断key
      K entryKey = e.getKey();
      if (entryKey == null) {
        tryDrainReferenceQueues();
        continue;
      }
      if (map.keyEquivalence.equivalent(key, entryKey)) {
        return e;
      }
    }
    return null;
}
02 从第一个 Entry 获取存活的值
V getLiveValue(ReferenceEntry<K, V> entry, long now) {
     if (entry.getKey() == null) {
        tryDrainReferenceQueues();
        return null;
     }
     V value = entry.getValueReference().get();
     if (value == null) {
       tryDrainReferenceQueues();
       return null;
     }
     if (map.isExpired(entry, now)) {
       tryExpireEntries(now);
       return null;
     }
     return value;
}

boolean isExpired(ReferenceEntry<K, V> entry, long now) {
    checkNotNull(entry);
    // 如果配置了 expireAfterAccess ,比较当前时间和 Entry 的 accessTime 比较
    if (expiresAfterAccess() && (now - entry.getAccessTime() >= expireAfterAccessNanos)) {
      return true;
    }
    // 如果配置了 expireAfterWrite ,比较当前时间和 Entry 的 writeTime 比较
    if (expiresAfterWrite() && (now - entry.getWriteTime() >= expireAfterWriteNanos)) {
      return true;
    }
    return false;
}
假如 Entry 的 key 为空,或者 vlaue 为空,或者过期了,则返回空 。
03 调度刷新 scheduleRefresh
V scheduleRefresh(
        ReferenceEntry<K, V> entry,
        K key,
        int hash,
        V oldValue,
        long now,
        CacheLoader<? super K, V> loader) {
       //1、是否配置了 refreshAfterWrite
       //2、用 writeTime 判断是否达到刷新的时间
       //3、是否在加载中,如果是则没必要再进行刷新
      if (map.refreshes()
          && (now - entry.getWriteTime() > map.refreshNanos)
          && !entry.getValueReference().isLoading()) {
          V newValue = refresh(key, hash, loader, true);
          if (newValue != null) {
              return newValue;
          }
      }
     return oldValue;
}
调度刷新方法会判断三个条件 :
- 配置了刷新时间 refreshAfterWrite
- 当前时间减去 Entry 的写入时间大于刷新时间
- 当前 Entry 未处于加载中
当满足了三个条件之后,调用 refresh 方法,当异步加载成功后,返回新值。
V refresh(K key, int hash, CacheLoader<? super K, V> loader, boolean checkTime) {
     //插入一个 LoadingValueReference ,实质是把对应Entry的ValueReference替换为新建的LoadingValueReference
     final LoadingValueReference<K, V> loadingValueReference =
         insertLoadingValueReference(key, hash, checkTime);
     if (loadingValueReference == null) {
       return null;
     }
     // 调用异步加载方法loadAsync
     ListenableFuture<V> result = loadAsync(key, hash, loadingValueReference, loader);
     if (result.isDone()) {
       try {
         return Uninterruptibles.getUninterruptibly(result);
       } catch (Throwable t) {
         // don't let refresh exceptions propagate; error was already logged
       }
     }
     return null;
}
首先将 Entry 对象的 ValueReference 包装为新建的 LoadingValueReference , 表明当前对象正在加载中。
LoadingValueReference<K, V> insertLoadingValueReference(
        final K key, final int hash, boolean checkTime) {
      ReferenceEntry<K, V> e = null;
      lock();
      try {
        long now = map.ticker.read();
        preWriteCleanup(now);
        AtomicReferenceArray<ReferenceEntry<K, V>> table = this.table;
        int index = hash & (table.length() - 1);
        ReferenceEntry<K, V> first = table.get(index);
        // Look for an existing entry.
        for (e = first; e != null; e = e.getNext()) {
          K entryKey = e.getKey();
          if (e.getHash() == hash
              && entryKey != null
              && map.keyEquivalence.equivalent(key, entryKey)) {
            // We found an existing entry.
            ValueReference<K, V> valueReference = e.getValueReference();
            if (valueReference.isLoading()
                || (checkTime && (now - e.getWriteTime() < map.refreshNanos))) {
              // refresh is a no-op if loading is pending
              // if checkTime, we want to check *after* acquiring the lock if refresh still needs
              // to be scheduled
              return null;
            }
            // continue returning old value while loading
            ++modCount;
            LoadingValueReference<K, V> loadingValueReference =
                new LoadingValueReference<>(valueReference);
            e.setValueReference(loadingValueReference);
            return loadingValueReference;
          }
        }
        ++modCount;
        LoadingValueReference<K, V> loadingValueReference = new LoadingValueReference<>();
        e = newEntry(key, hash, first);
        e.setValueReference(loadingValueReference);
        table.set(index, e);
        return loadingValueReference;
      } finally {
        unlock();
        postWriteCleanup();
      }
}
接下来,分析异步加载loadAsync方法:
ListenableFuture<V> loadAsync(
        final K key,
        final int hash,
        final LoadingValueReference<K, V> loadingValueReference,
        CacheLoader<? super K, V> loader) {
      final ListenableFuture<V> loadingFuture = loadingValueReference.loadFuture(key, loader);
      loadingFuture.addListener(
          new Runnable() {
            @Override
            public void run() {
              try {
                getAndRecordStats(key, hash, loadingValueReference, loadingFuture);
              } catch (Throwable t) {
                logger.log(Level.WARNING, "Exception thrown during refresh", t);
                loadingValueReference.setException(t);
              }
            }
          },
          directExecutor());
      return loadingFuture;
}

public ListenableFuture<V> loadFuture(K key, CacheLoader<? super K, V> loader) {
      try {
        // 记录耗时时间
        stopwatch.start();
        V previousValue = oldValue.get();
        if (previousValue == null) {
          V newValue = loader.load(key);
          return set(newValue) ? futureValue : Futures.immediateFuture(newValue);
        }
        ListenableFuture<V> newValue = loader.reload(key, previousValue);
        if (newValue == null) {
          return Futures.immediateFuture(null);
        }
        // To avoid a race, make sure the refreshed value is set into loadingValueReference
        // *before* returning newValue from the cache query.
        return transform(
            newValue,
            new com.google.common.base.Function<V, V>() {
              @Override
              public V apply(V newValue) {
                LoadingValueReference.this.set(newValue);
                return newValue;
              }
            },
            directExecutor());
      } catch (Throwable t) {
        ListenableFuture<V> result = setException(t) ? futureValue : fullyFailedFuture(t);
        if (t instanceof InterruptedException) {
          Thread.currentThread().interrupt();
        }
        return result;
      }
 }
loadAsync 方法流程:
- 调用 loadingValueReference 对象的 loadFuture 方法,假如旧数据为空值,则同步调用加载器 loader 的 load 方法 ,并返回包装了新值的 Future 。
- 假如旧数据不为空值,则调用加载器 loader 的 reload 方法(此处可以重新实现为异步的方式),经过转换操作返回包装了新值的 Future 。
- 将新的值存储在 Entry 对象里。
04 查询/加载 lockedGetOrLoad
如果之前没有写入过数据 、 数据已经过期、 数据不是在加载中,则会调用lockedGetOrLoad方法。
V lockedGetOrLoad(K key, int hash, CacheLoader<? super K, V> loader) throws ExecutionException {
    ReferenceEntry<K, V> e;
    ValueReference<K, V> valueReference = null;
    LoadingValueReference<K, V> loadingValueReference = null;
    //用来判断是否需要创建一个新的Entry
    boolean createNewEntry = true;
    //segment上锁
    lock();
    try {
      // re-read ticker once inside the lock
      long now = map.ticker.read();
      //做一些清理工作
      preWriteCleanup(now);

      int newCount = this.count - 1;
      AtomicReferenceArray<ReferenceEntry<K, V>> table = this.table;
      int index = hash & (table.length() - 1);
      ReferenceEntry<K, V> first = table.get(index);

      //通过key定位entry
      for (e = first; e != null; e = e.getNext()) {
        K entryKey = e.getKey();
        if (e.getHash() == hash
            && entryKey != null
            && map.keyEquivalence.equivalent(key, entryKey)) {
          //找到entry
          valueReference = e.getValueReference();
          //如果value在加载中则不需要重复创建entry
          if (valueReference.isLoading()) {
            createNewEntry = false;
          } else {
            V value = valueReference.get();
            //value为null说明已经过期且被清理掉了
            if (value == null) {
              //写通知queue
              enqueueNotification(
                  entryKey, hash, value, valueReference.getWeight(), RemovalCause.COLLECTED);
            //过期但还没被清理
            } else if (map.isExpired(e, now)) {
              //写通知queue
              // This is a duplicate check, as preWriteCleanup already purged expired
              // entries, but let's accomodate an incorrect expiration queue.
              enqueueNotification(
                  entryKey, hash, value, valueReference.getWeight(), RemovalCause.EXPIRED);
            } else {
              recordLockedRead(e, now);
              statsCounter.recordHits(1);
              //其他情况则直接返回value
              //来到这步,是不是觉得有点奇怪,我们分析一下:
              //进入lockedGetOrLoad方法的条件是数据已经过期 || 数据不是在加载中,但是在lock之前都有可能发生并发,进而改变entry的状态,所以在上面中再次判断了isLoading和isExpired。所以来到这步说明,原来数据是过期的且在加载中,lock的前一刻加载完成了,到了这步就有值了。
              return value;
            }
            writeQueue.remove(e);
            accessQueue.remove(e);
            this.count = newCount; // write-volatile
          }
          break;
        }
      }
      //创建一个Entry,且set一个新的 LoadingValueReference。
      if (createNewEntry) {
        loadingValueReference = new LoadingValueReference<>();

        if (e == null) {
          e = newEntry(key, hash, first);
          e.setValueReference(loadingValueReference);
          table.set(index, e);
        } else {
          e.setValueReference(loadingValueReference);
        }
      }
    } finally {
      unlock();
      postWriteCleanup();
    }
	   //同步加载数据
    if (createNewEntry) {
      try {
        synchronized (e) {
          return loadSync(key, hash, loadingValueReference, loader);
        }
      } finally {
        statsCounter.recordMisses(1);
      }
    } else {
      // The entry already exists. Wait for loading.
      return waitForLoadingValue(e, key, valueReference);
    }
}
5 总结
通过解析 Guava Cache 的实现原理,我们发现 Guava LocalCache 与 ConcurrentHashMap 有以下不同:
ConcurrentHashMap ”分段控制并发“是隐式的(实现中没有Segment对象),而 LocalCache 是显式的。
在 JDK 1.8 之后,ConcurrentHashMap 采用
synchronized + CAS实现:当 put 的元素在哈希桶数组中不存在时,直接 CAS 进行写操作;在发生哈希冲突的情况下使用 synchronized 锁定头节点。其实是比分段锁更细粒度的锁实现,只在特定场景下锁定其中一个哈希桶,降低锁的影响范围。Guava Cache 使用 ReferenceEntry 来封装键值对,并且对于值来说,还额外实现了 ValueReference 引用对象来封装对应 Value 对象。
Guava Cache 支持过期 + 自动 loader 机制,这也使得其加锁方式与 ConcurrentHashMap 不同。
Guava Cache 支持 segment 粒度上支持了 LRU 机制, 体现在 Segment 上就是 writeQueue 和 accessQueue。
队列中的元素按照访问或者写时间排序,新的元素会被添加到队列尾部。如果,在队列中已经存在了该元素,则会先delete掉,然后再尾部添加该节点。
参考资料:
https://www.cnblogs.com/songjiyang/p/16877642.html
https://albenw.github.io/posts/df42dc84/
https://blog.csdn.net/weixin_38569499/article/details/103720524
https://qiankunli.github.io/2019/06/20/guava_cache.html

